Ragdoll Kittens: A Seven-Day Plan for Calm Ear Checks After Playtime
Short answer: The best way to check a Ragdoll kitten’s ears is to make the process brief, gentle, and predictable. After playtime, wait until your kitten has settled, look only at the parts you can see, reward cooperation, and stop before your kitten becomes worried. This seven-day plan is designed to build comfort with handling—not to encourage routine deep cleaning.
Healthy ears usually do not need frequent cleaning. A calm visual check can help you notice changes such as swelling, discharge, odor, or obvious irritation, while your veterinarian should diagnose and treat ear problems. The goal is a kitten who can accept a quick look during grooming or a veterinary examination without being held down or frightened.
What calm Ragdoll kitten ear care should involve
An ear check is an observation. It means looking at the outer ear flap and the entrance to the ear canal in good light. It does not mean inserting a cotton swab, your finger, or a cleaning tool into the canal.
Ragdolls do not need a special ear-cleaning routine simply because they are Ragdolls. Their long, soft coat can make the outer ear a little harder to see, but the same basic approach applies to any kitten: gentle handling, no force, and veterinary advice when something looks or feels abnormal.
A small amount of ear wax can be normal, and wax color by itself cannot confirm a problem. Pay attention to the whole picture, including your kitten’s behavior and whether both ears look similar. A strong odor, repeated scratching, head shaking, pain, redness, swelling, or unusual discharge deserves more attention than a tiny amount of ordinary wax.
Prepare before the seven-day plan
Choose a quiet place with a comfortable surface and bright, indirect light. Keep the first sessions short—often less than a minute. A kitten who has just finished a lively game may still be too excited, so use the calm period after play rather than trying to inspect the ears while your kitten is wriggling or chasing toys.
- Use small, high-value treats or a favorite food reward.
- Have a soft toy nearby if play is a better reward than food.
- Keep your phone light or a lamp available, but never shine a bright light directly into the ear.
- Use a clean towel under the kitten if the surface is slippery; do not wrap tightly or pin the kitten down.
- Keep cotton swabs, hydrogen peroxide, alcohol, essential oils, vinegar, and human ear products away from the session.
If a veterinarian has already prescribed an ear cleaner, medication, or a particular technique, follow those instructions instead of using a general training plan as a substitute. Let your kitten become comfortable with the bottle separately; do not put cleaner into a healthy ear just for practice.
The seven-day ear-check plan
Day 1: Make the area and cue feel safe
Sit with your kitten after a short play session and allow a few minutes to settle. Offer a treat while touching the shoulder or chest, then release your hand. You are not touching the ears yet. Repeat two or three times, then finish with play or food.
Use the same quiet phrase each time, such as ear check or gentle look. The phrase should predict something pleasant, not a long session. If your kitten walks away, let that happen and try again later.
Day 2: Practice touches around the head
When your kitten is relaxed, stroke from the shoulder toward the cheek. Briefly touch the cheek, the area behind the ear, and the base of the ear flap. Reward after each calm touch. Keep your movements slow and use only enough pressure to make contact.
Do not chase the head if your kitten turns away. A turn, flattened ears, tail flicking, sudden stillness, or attempts to escape are useful information. Pause, give space, and return to an easier touch next time.
Day 3: Lift the outer ear flap
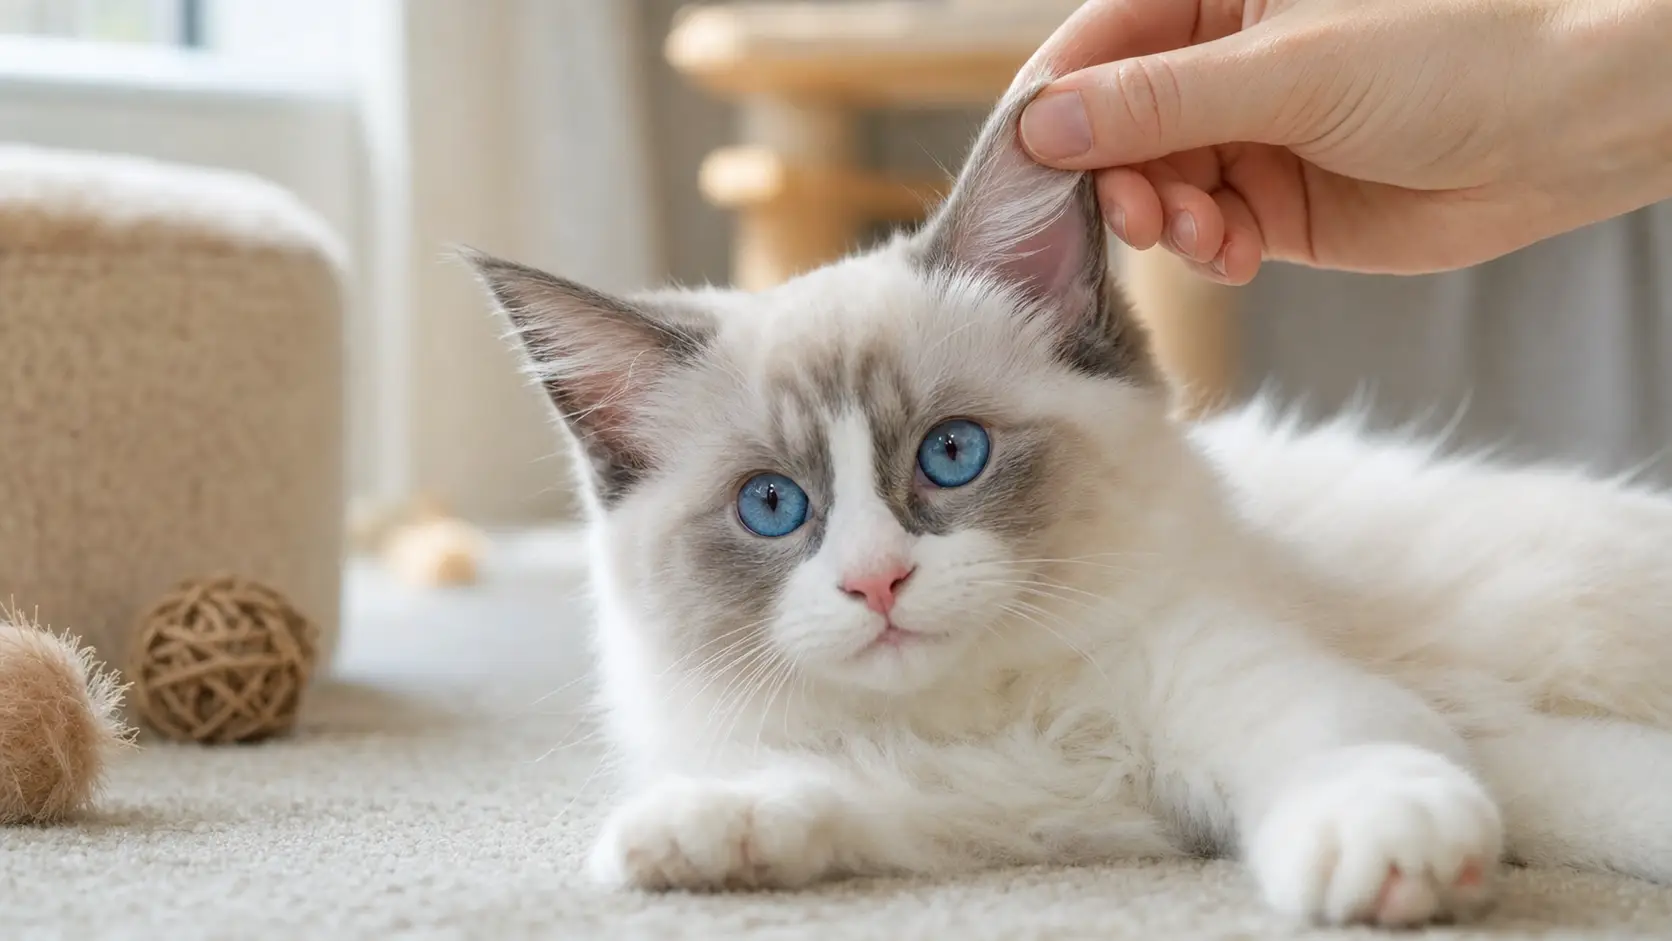
Touch the outside of one ear, lift the flap slightly, and look for just a second. You are checking the visible skin and the entrance—not opening the canal or pulling the ear into an uncomfortable position. Reward immediately and stop after one or two repetitions.
Work with one ear at a time. A kitten does not need to tolerate both ears during every practice session. Ending after a successful single-ear check is better than pushing for a complete inspection and creating a struggle.
Day 4: Add the settled after-play routine
Now practice the sequence you are likely to use in real life: finish a gentle game, wait until your kitten chooses a relaxed position, say your cue, inspect one ear, reward, and then offer a short break. If your kitten remains comfortable, look briefly at the other ear.
Compare the two sides without assuming they must look identical. Mild differences can occur, but a new one-sided change—such as swelling, odor, discharge, or obvious tenderness—is worth noting for your veterinarian.
Day 5: Introduce the sight of supplies
Place a closed bottle of veterinarian-recommended ear cleaner or a folded cloth nearby. Let your kitten see and sniff it, then provide a reward. Do not apply anything unless your veterinarian has specifically advised it.
This step separates the sight of a supply from the feeling of treatment. It is especially helpful if your kitten may eventually need medication. Keep the bottle closed and avoid waving it near the face.
Day 6: Practice a short, realistic check
Perform a complete but brief check: touch the shoulder, stroke the cheek, lift one flap, look at the visible area, and release. Repeat on the other side only if your kitten is still relaxed. Aim for roughly 30 to 90 seconds, including rewards.
Do not try to remove debris from deep inside the ear. If something appears stuck, if the ear is painful, or if your kitten suddenly resists a previously easy step, stop and make a note for the veterinary appointment.
Day 7: Choose your maintenance routine
Repeat the calm after-play check and reward your kitten for cooperating. At this point, you can decide what works for your household. Continue occasional, brief checks during grooming or after play, but do not turn the seven-day practice into automatic daily ear cleaning.
Some kittens need extra practice. If your kitten becomes tense, go back to the last comfortable day for several sessions. Progress means your kitten feels secure—not that you complete every step on a fixed timetable.
A simple after-play ear-check sequence
- Let the excitement fade. Wait until your kitten is breathing normally, standing or sitting comfortably, and choosing to stay near you.
- Give the cue. Say the same calm phrase each time.
- Start with a familiar touch. Stroke the shoulder and cheek before approaching the ear.
- Look, do not probe. Lift the outer flap just enough to see the entrance.
- Check both sides when possible. Notice changes in odor, discharge, swelling, redness, or sensitivity.
- Reward and release. Let your kitten leave or return to play before signs of stress appear.
This sequence works because it gives the kitten control and keeps the handling predictable. It also prevents a common mistake: waiting until a kitten is already struggling, then holding tighter to finish the inspection.
What not to put in a kitten’s ears
Never use cotton swabs inside the ear canal. They can push material farther inward or injure delicate tissue. Avoid hydrogen peroxide, alcohol, vinegar, essential oils, and leftover medication. A product that was safe for another pet may be unsuitable for a kitten or for a different ear condition.
Even veterinary ear cleaners should be used according to professional advice, particularly if the ear may be inflamed or the eardrum could be damaged. Cleaning a painful ear at home can increase distress and may make it harder for a veterinarian to assess what is happening.
When to call the veterinarian
Contact your veterinarian if you notice persistent head shaking, repeated scratching, a strong or unusual odor, redness, swelling, blood, pus-like fluid, dark crumbly debris, or clear signs of pain. Dark debris can occur with ear mites, but it can also be confused with other ear problems; appearance alone is not a diagnosis.
Seek prompt veterinary advice for a head tilt, loss of balance, severe pain, sudden hearing or behavior changes, facial weakness, or significant swelling. If your kitten seems acutely unwell, call a veterinary clinic or emergency service rather than attempting home treatment.
For reliable background information, read the Cornell Feline Health Center’s overview of ear mites and VCA’s guidance on ear cleaning in cats. Your own veterinarian remains the right source for examining a kitten and choosing treatment.
Frequently asked questions
Should I clean my Ragdoll kitten’s ears every week?
Not automatically. A healthy kitten may need only occasional visual checks, while a kitten with a diagnosed condition may need a specific cleaning schedule. Follow your veterinarian’s recommendation rather than cleaning by calendar alone.
What if my kitten refuses the ear check?
Stop before the struggle escalates. Return to touching the shoulder or cheek, reward calm behavior, and try again later. You can also practice one ear per session. Force may make future handling more difficult.
Is brown material always ear mites?
No. Wax color is not enough to identify mites or an infection. Persistent dark debris, odor, scratching, or head shaking should be assessed by a veterinarian, who can examine the ear and recommend appropriate treatment.
Make calm handling part of kitten care
A seven-day plan is a starting point, not a test your kitten must pass. Keep each check short, respect signs of stress, and focus on noticing changes rather than making the ears look perfectly clean. For more practical guidance on raising and caring for Ragdoll kittens, explore CTkittens.com.

Rachel Cohen is a journalist and producer with a passion for audio storytelling, health and science reporting, and feline companions.
A graduate of Middlebury College, Rachel spends her weekends exploring the mountains and when she isn’t outdoors or chasing a story, she can usually be found hanging out with her cats.