
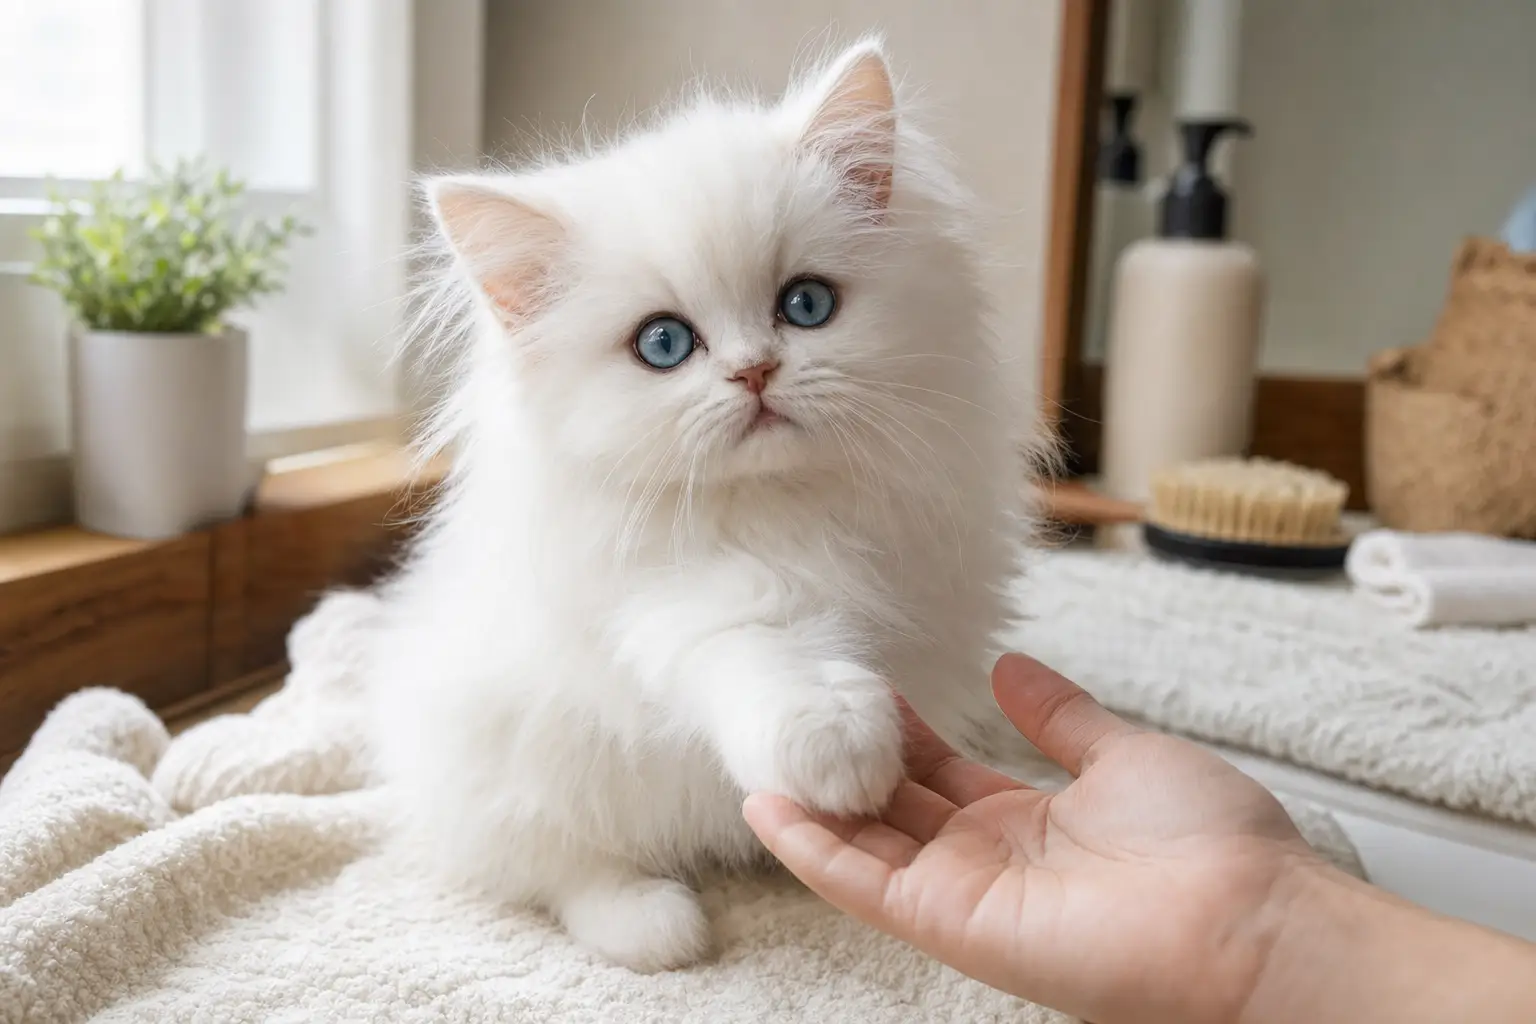
Persian Kittens: A Photo Guide to Gentle Paw Handling
A cautious kitten does not need to be pinned down or persuaded through a long grooming session. The safest approach to kitten paw handling is to move in tiny steps: touch the shoulder, stroke down the leg, briefly touch the paw, and reward the kitten before concern turns into a struggle.
For a Persian kitten, this early cooperation is especially useful. Long fur can hide litter, mats, irritated skin, or a broken claw around the feet. Teaching a kitten that paw checks are predictable and brief makes future grooming and veterinary care easier without forcing the issue today.
The short version: work when your kitten is calm, use a nonslip surface, handle one paw for only a second or two at first, and stop while the kitten is still comfortable. Progress comes from many easy repetitions, not one successful restraint session.
What you are actually teaching
Paw handling is not simply getting a kitten to tolerate someone grabbing a foot. It is cooperative care: the kitten learns that a hand approaching the leg leads to something safe, brief, and rewarding. The eventual goal might be checking the pads, looking at a claw, brushing fur around the toes, or trimming a small nail tip.
That goal is different from holding a frightened kitten still. Restraint may be necessary for urgent veterinary treatment, but it is a poor foundation for routine home care. A kitten that is allowed to retreat before becoming overwhelmed is more likely to approach willingly next time.
Before the first photo
Choose a quiet room and a moment when your kitten is awake but not racing around. Sit on the floor or beside a low surface so a startled kitten cannot fall. A fleece blanket or rubber-backed mat can provide traction; avoid slippery tables and do not begin by waking the kitten.
- Have a few tiny treats or a favorite lickable reward ready.
- Keep your hands warm and your movements slow.
- Let the kitten see and sniff your hand before you touch the leg.
- Use a soft voice, but do not repeatedly coax or corner the kitten.
- Plan for a session lasting seconds, not minutes.
Watch the whole kitten rather than focusing only on the paw. A relaxed body, ordinary breathing, neutral ears, and an interest in the treat suggest that you can continue. Tail lashing, sudden stillness, ears turned back, repeated paw withdrawal, growling, hissing, or an attempt to hide mean the exercise has become too difficult. End calmly and try an easier step later.
Kitten paw handling: the photo-by-photo walkthrough
Each frame below represents a separate training level. Some kittens may move through several levels in a day; a cautious kitten may need many sessions at one level. There is no benefit in advancing simply because the calendar says it is time.
Photo 1: Begin with a relaxed kitten
Start by sitting beside your kitten and offering a treat without touching. If the kitten accepts it, place your hand a short distance away. Allow a sniff, then reward. This first photograph matters because it shows that the kitten has a choice: the hand is present, but it is not chasing or trapping the kitten.
Repeat until your kitten can remain relaxed while your hand moves slightly closer. If the kitten backs away, do not follow. Put more distance between you and try again.
Photo 2: Touch the shoulder before the paw
Touch the shoulder or upper leg for one gentle stroke, then remove your hand and give a reward. Do not reach straight for the foot. The shoulder is less vulnerable than the paw and lets the kitten learn what your movement means.
Repeat on the same side once or twice if the kitten stays loose and interested. Then stop. A successful first session may contain only three calm strokes.
Photo 3: Follow the leg down
Over later repetitions, let your fingers travel from the shoulder toward the elbow and then the wrist. Keep the movement smooth rather than rubbing back and forth over a sensitive spot. Reward at the end of each stroke.
When your kitten is comfortable with this, allow your fingers to rest briefly above the paw. Do not close your hand around it yet. This is where many people move too quickly. The kitten may accept a stroke but object to being held, and that is useful information rather than bad behavior.
Photo 4: Make brief paw contact
Touch the top of the paw for about one second, release, and reward immediately. At first, do not lift the paw. Your timing should communicate that calm contact makes the hand go away and brings something pleasant.
If the kitten pulls back, let go at once. Do not follow the retreating paw or hold on until the kitten stops resisting. Wait for another relaxed moment and return to the previous step.
Photo 5: Support, then lift for a moment
Once light contact is easy, place your fingers under the paw and lift it only a small distance for one second. Put it down before the kitten asks you to. Reward, then finish the session.
Never let a kitten dangle by a leg, twist the wrist, or squeeze the pads. If you need to reposition the kitten, support the chest and body rather than using the paw as a handle. Practice front paws first if they are easier; back paws can be introduced in the same gradual way.
Photo 6: Briefly inspect the pads and toes
When lifting is comfortable, use one fingertip to touch a pad or gently separate one toe. Release immediately. You do not need to inspect every toe in one session. One toe, one reward, and a finished exercise is enough.
Do not forcibly extend the claws. Cats can extend them through gentle pressure on the toe, but a worried kitten may find this more intrusive. Build toward it slowly, and stop if the paw becomes tense or the kitten starts pulling away.
If nail trimming is the long-term goal
Paw handling and nail trimming are related but not identical skills. Your kitten may allow a paw touch and still need more practice with the sound and feel of clippers. Introduce the tool separately: let your kitten sniff closed clippers, reward, and put them away. You can later touch the closed tool to the paw without cutting.
When a kitten is fully comfortable, trim only the sharp tip of one claw and stop. The quick, which contains blood vessels and nerves, is easier to avoid when you remove very little. If the nails are dark, the quick may be difficult to see. Ask a veterinarian or experienced cat groomer to demonstrate rather than guessing.
Do not make the first nail-trimming attempt a full manicure. One successful claw is more valuable than ten stressful ones. If a claw is accidentally cut too short and bleeding does not stop with gentle pressure, contact a veterinary professional.
When to pause training or call your veterinarian
A kitten may dislike paw handling simply because it is unfamiliar. However, a sudden change or strong reaction can also indicate discomfort. Stop the exercise and arrange veterinary advice if your kitten consistently limps, cries when one paw is touched, licks or chews a foot, has swelling or redness, shows a broken claw, or cannot bear weight normally.
Do not pull at a mat, splinter, thread, or litter stuck between the pads. Long Persian fur can make small problems harder to see. If something is embedded or the skin looks injured, a veterinarian should guide removal. For routine coat or paw-fur work, a cat-experienced groomer can also help without turning the session into a struggle.
Common mistakes and better alternatives
| Common mistake | Try this instead |
|---|---|
| Grabbing the paw as soon as the kitten sits down | Begin with a nearby hand, a reward, and a shoulder stroke. |
| Holding on when the kitten pulls away | Release immediately and return to an easier step next time. |
| Trying to handle all four paws at once | Practice one brief contact on one paw, then finish. |
| Using treats after a long struggle | Reward while the kitten is still calm so the association stays clear. |
| Chasing a kitten around the room | End the session and choose a better moment rather than cornering the kitten. |
For broader cat-friendly handling guidance, see International Cat Care’s handling advice and the Cat Friendly Homes guide to handling cats. General grooming information is also available from the ASPCA.
Frequently asked questions
How often should I practice?
One or two tiny sessions a day can work well, but your kitten’s behavior is the best guide. Stop after a calm success, even if that success lasts only ten seconds. A break is preferable to repeating the exercise until the kitten becomes upset.
What if my kitten will not accept treats?
Reduce the challenge first. Move your hand farther away, use a familiar meal instead of a new treat, or practice after the kitten has settled from play. If the kitten still avoids the interaction, end it. Food should reward comfort, not distract a frightened kitten while handling continues.
Should I practice while my kitten is sleepy?
A relaxed, awake kitten is usually a better learner than one that is deeply asleep. Never start by suddenly grabbing a sleeping kitten’s paw. Let the kitten wake, notice you, and choose whether to remain nearby.
A calm finish is the real success
The best paw-handling session ends before your kitten needs to escape. Touch, release, reward, and give the kitten a clear way to move away. With a Persian kitten, those small lessons can make future paw checks, brushing, and veterinary visits gentler for everyone.
Looking for more practical guidance as your kitten settles in? Explore CTkittens.com for additional Persian kitten care resources.

Rachel Cohen is a journalist and producer with a passion for audio storytelling, health and science reporting, and feline companions.
A graduate of Middlebury College, Rachel spends her weekends exploring the mountains and when she isn’t outdoors or chasing a story, she can usually be found hanging out with her cats.
Would this tiny-step method still work with an older rescue Persian who already hates paw touching, or is that habit kinda baked in by then?
Only bit I’d push back on is always starting with the front paws, cuz my Persian guards those like treasure but barely cares about the back ones lol.
Only bit I’d push back on is treats being the default reward, some kittens couldnt care less about snacks and a quick play sesh works way better tbh.
Honestly the “one toe, one reward, then quit” rule is probs gonna save me from turning nail trims into a full-on boss battle lol.
Gonna try that “one paw, one second, then snack” routine, cuz my fluffy dude acts like every nail check is a federal crime lol.
Kinda wondering if this tiny-step method works just as good with older rescue Persians who already freak out when anyone goes near their paws, cuz mine acts like I’m stealing his beans lol?
Anyone else wonder if stopping after just one calm toe check is actually the secret sauce, cause my cat remembers a forced manicure like it was a war crime lol?